Initial Phase - Adding Eligibility Information
The Eligibility Information provides a means of recording the eligibility dates and evaluation components) for future reference and the creation and/or printing of documents. Eligibility is the area concerned with the student's status as to entry into the Special Education program within School System.
General Eligibility Notes
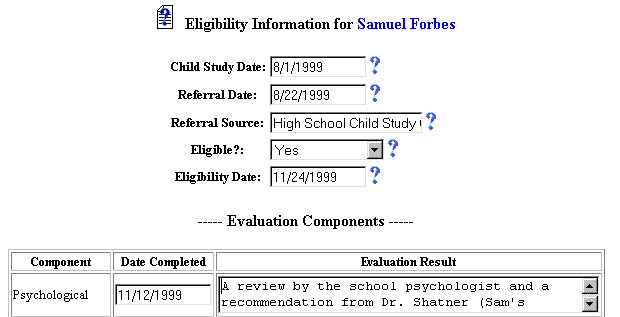
The Child Study Source is the source that referred the selected student to the Child Study Team (or other appropriate team).
The Child Study Date is the date the selected student was referred to the Child Study Team (or other appropriate team).
The Referral Date is the date the selected student was approved for Special Education by the Child Study Team.
The Referral Source is the source of the Child Study Team.
The Eligibility Checkbox is used by EasyIEPTM to track the eligibility of the student.
The Eligibility Date is the date the decision for eligibility was made and is used by EasyIEPTM to track the eligibility and allow the notification of deadlines in the IEP compliance process.
Evaluation Components used in the eligibility process are collected from the list used by the School System. Other components can be added or deleted as needed by School System administrators.
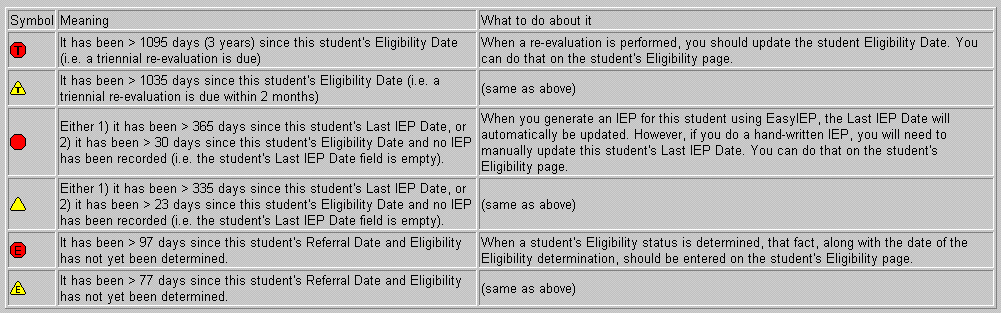
When selecting a specific student to input data, a symbol will appear next to their name. This will track the compliance of the selected student according to the Eligibility Date, the Referral Date or the TriennialDate. The chart below explains the meaning of each symbol and the actions required.
Most fields will have an asterisk or a question mark beside them. You may click once on these symbols to access the help for that field. All fields with an asterisk ( * ) to the rightMUST HAVE INFORMATION ENTERED before the data can be entered into the EasyIEP TM database. All fields with a question mark ( ? ) to the right do not require information to be entered at this time, and, can be edited or updated at any time.
Accessing the Students Area
To add information for a selected student or students, you must access the Students area. This area will appear after you click once on the Students Button on the Main Menu Bar. The Main Menu Bar will be at the top of the Main Page after you log-in. The words "Main Menu" will be darkened to distinguish it.
NOTE: If you have been working in another area of EasyIEP TM (i.e. Schools, School System, Users), and theMain Menu Bar is not at the top of the browser page, click once on the Main Menu Button of the existing menu bar at the top of the browser page. This will take you to the Main Page. TheMain Menu Bar will be at the top. Click once on theStudents Button to access the Students area.
Step 1 - Criteria for Selecting a Student
Step 2 - Adding Eligibility Information
Step 3 - Child Study Date
Step 4 - Child Study Source
Step 5 - Referral Date
Step 6 - Referral Source
Step 7 - Eligibility Date
Step 8 -Is the Student Eligible?
Step 9 - Primary Disability
Step 10/11 - Secondary and Third Disability
Step 12 - Select Evaluation Components
12a. Click on the Select Evaluation Components Button.

You will be taken to the Select Eligibility Evaluation Components Page.
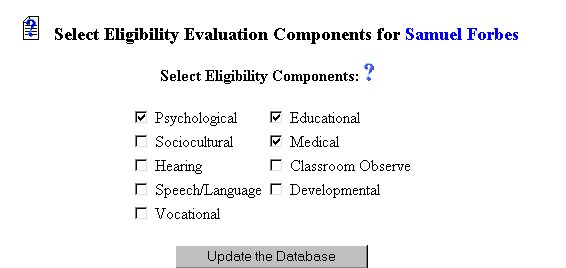
12b. Click once in the Checkbox to the left to select (or de-select) any of the Eligibility Components that apply to the selected student. For purposes of example, the Psychological, Hearing, Speech/Language, Educational, and Medical Components were selected.
12c. When finished, click once on the Update the Database Button. The Eligibility Information Page will appear with the selected Evaluation Components and their date and Evaluation Result fields added.
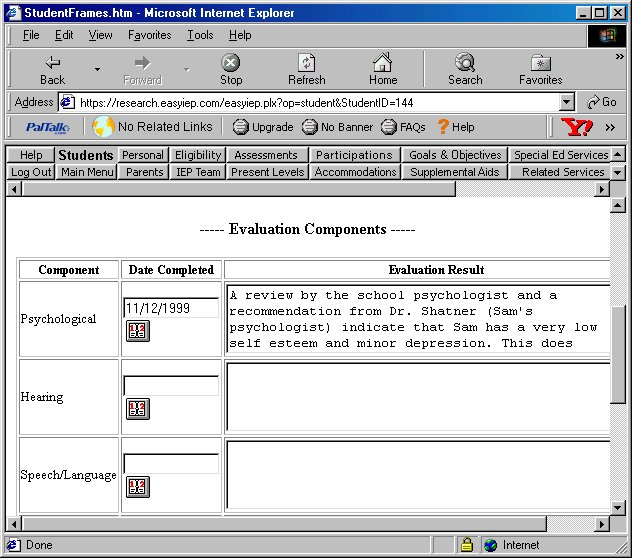
12d. If the date and/or Evaluation Result for Psychological Component is known, click once on the Calendar icon to the right of the white text field next to Psychological in the column marked Date Completed and using the arrows on the Calendar, enter the Date or type-in the date (mm/dd/yy). Click once in the white text field next to Evaluation Result and type in the result.
12e. If the date and/or Evaluation Result for Hearing Component is known, click once on the Calendar icon to the right of the white text field next to Hearing in the column marked Date Completed and using the arrows on the Calendar, enter the Date or type-in the date (mm/dd/yy). Click once in the white text field next to Evaluation Result and type in the result.
12f. If the date and/or Evaluation Result for Speech/Language Component is known, click once on the Calendar icon to the right of the white text field next to Speech/Language in the column marked Date Completed and using the arrows on the Calendar, enter the Date or type-in the date (mm/dd/yy). Click once in the white text field next to Evaluation Result and type in the result.
12g. If the date and/or Evaluation Result for Educational Component is known, click once on the Calendar icon to the right of the white text field next to Educational in the column marked Date Completed and using the arrows on the Calendar, enter the Date or type-in the date (mm/dd/yy). Click once in the white text field next to Evaluation Result and type in the result.
12h. If the date and/or Evaluation Result for Medical Component is known, click once on the Calendar icon to the right of the white text field next to Medical in the column marked Date Completed and using the arrows on the Calendar, enter the Date or type-in the date (mm/dd/yy). Click once in the white text field next to Evaluation Result and type in the result.
Step 13 - Update the Database
When finished entering the Eligibility information, click once on the Update DatabaseButton. The following message will appear: The Database has been updated with the information you entered.
The Adding Eligibility Information part of the initial phase is now complete for the selected student. If you wish to continue the initial phase for the selected student, click once on the IEP TeamButton in the Students Menu Bar.
If you prefer to go to another area to enter IEP data, click on that Button in the Students Menu Bar.
If you prefer to access another part of the database (i.e. Schools, Users, etc.), click once on the Main Menu Button of the Students Menu Bar to access the Main Page and the Main Menu Bar.