Initial Phase - Adding Parent Information
The Parent/Guardian Information section of the Students Area provides a means of recording the parent/guardian Name, Address, Phone Numbers, and other pertinent information for future reference and the creation and/or printing of documents. The Parent/Guardian are the person(s) who are legally responsible for the student in question.
Note: Other significant persons (doctor, other relative, therapist, etc.) may also be added using the Add Parent Page. The Relationship dropdown box has these and other selections. If you would like these selections to be part of the IEP Team, indicate that by checking the Include on IEP Team box on the Add Parent Page.
Most fields will have an asterisk or a question mark beside them. You may click once on these symbols to access the help for that field. All fields with an asterisk ( * ) to the right MUST HAVE INFORMATION ENTERED before the data can be entered into the EasyIEPTM database. All fields with a question mark ( ? ) to the right do not require information to be entered at this time, and, can be edited or updated at any time.
Accessing the Students Area
To add information for a selected student's parent(s), you must access the Students area. This area will appear after you click once on the Students Button on the Main Menu Bar. The Main Menu Bar will be at the top of the Main Page after you log-in. The words "Main Menu" will be darkened to distinguish it.
NOTE: If you have been working in another area of EasyIEP TM(i.e. Schools, School System, Users), and the Main Menu Bar is not at the top of the browser Page, click once on the Main Menu Button of the existing menu bar at the top of the browser Page. This will take you to the Main Page. The Main Menu Bar will be at the top. Click once on the Students Button to access the Studentsarea.
Adding Parent/Guardian Information
Step 1 - Criteria for Selecting a Student
Step 2 - Parent/Guardian Page
If no Parent/Guardian information has been entered for the selected student, go to Step 3
If Parent/Guardian information has been entered for the selected student and needs to be edited, go to Step 4
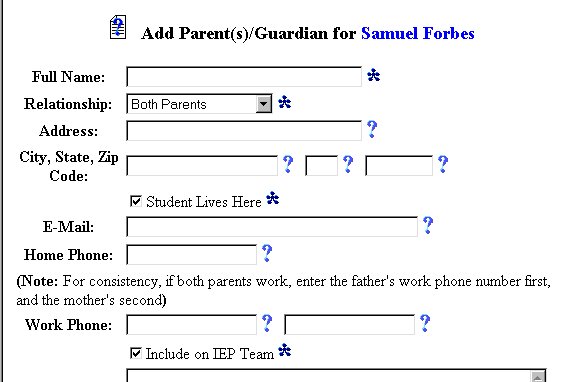
Step 3 - No Parent/Guardian Information Entered into the Database
Step 4 - If Parent/Guardian Information has already been entered into the Database
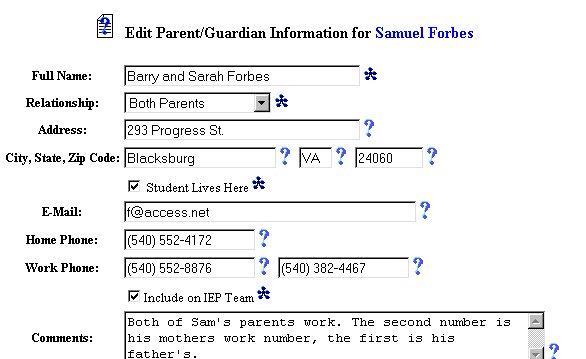
Step 5 - Full Name
NOTE: This is a required field and must have data entered in this field for data to be entered into the database.
Step 6 - Relationship (Parents/Guardian/Doctor/Relative/etc.)
Note: Other significant persons (Doctor, other relative, Therapist, etc.) may also be added. The Relationship dropdown box has these and other selections. If you would like these selections to be part of the IEP Team, indicate that by checking the "Include on IEP Team"box.
NOTE: This is a required field and must have data entered in this field for data to be entered into the database.
Step 7 - Address
Step 8 - City/State/Zip Code
Step 9 - Student Lives Here
Click once in the Checkbox to the left of "Student Lives Here" to record that the selected student lives at the above address.
Step 10 - E-Mail (If the parent/guardian has an E-Mail address)
Step 11 - Home Phone
Step 12 - Work Phone
Step 13 - Include on IEP Team
Click once in the Checkbox to the left of "Include on IEP Team" if the parent(s)/guardian(s) are members of the student's IEP Team.
NOTE: The parent /guardian /other will NOT appear on the IEP Team list if this box is not checked.
Step 14 - Comments
Step 15 - Update the Database Button
When you have completed entering all of the data you wish to enter at this time, click once on the Update the Database Button.
The Adding Parent/Guardian Information part of the initial phase is now complete for the selected student. If you wish to continue the initial phase for the selected student, click once on the EligibilityButton in the Students Menu Bar at the top of the Page.
If you prefer to go to another area to enter IEP data, click on that Button in the Students Menu Bar at the top of the Page.
If you prefer to access another part of the database (i.e. Schools, Users, etc.), click once on the Main Menu Button of the Students Menu Bar to access the Main Page and the Main Menu Bar.