Edit Phase - Editing Student Personal Information
The Student Information section of the Students Area provides a means of recording the student's Name, Grade, Race, Sex, Primary Disability, and other pertinent information for future reference and the creation and/or printing of documents. The student is THE focus of the Special Education program. The creation and monitoring of the IEP will aid in the success of the student throughout their entire academic career.
The entry of accurate student information is critical to the monitoring, placement and evaluation of all aspects of the IEP process. To edit the student information for the selected student, follow the steps below.
Most fields will have an asterisk or a question mark beside them. You may click once on these symbols to access the help for that field. All fields with an asterisk ( * ) to the rightMUST HAVE INFORMATION ENTERED before the data can be entered into the Easy IEPTM database. All fields with a question mark ( ? ) to the right do not require information to be entered at this time, and, can be edited or updated at any time.
Accessing the Students Area
To add information for a selected student or students, you must access the Students area. This area will appear after you click once on the Students button on the Main Menu Bar. The Main Menu Bar will be at the top of the Main Page after you log-in. The words "Main Menu" will be darkened to distinguish it.
NOTE: If you have been working in another area of EasyIEP TM(i.e. Schools, School System, Users), and the Main Menu Bar is not at the top of the browser page, click once on the Main Menu Button of the existing menu bar at the top of the browser page. This will take you to the Main Page. The Main Menu Bar will be at the top. Click once on the Students Button to access the Students area.
Editing Student Personal Information
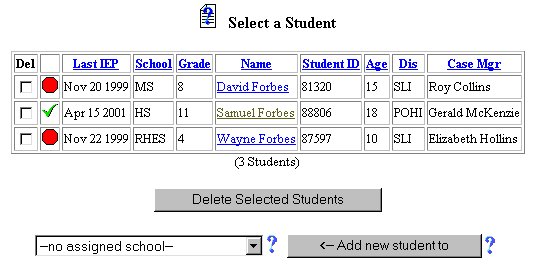
Step 1 - Criteria for Selecting a Student
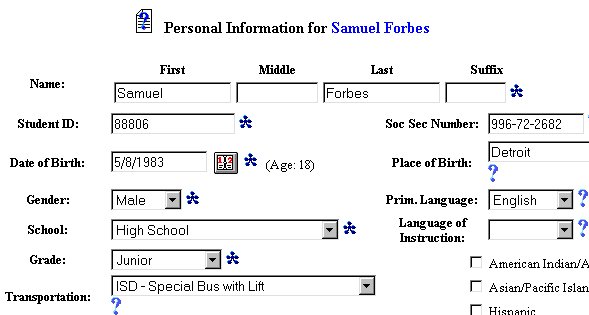

Step 2 - Name
This is a required field and must have data entered for this and any other data on the page to be updated into the EasyIEPTM database.
This is an optional field and may or may not have data entered.
This is a required field and must have data entered for this and any other data on the page to be updated into the EasyIEPTM database.
This is an optional field and may or may not have data entered.
Step 3 - Student Identification Number
NOTE: This is a required field and must have data entered in this field for data to be entered into the database.
NOTE: The student Identification Number (ID) is a unique number for classifying the selected student, and, should not be confused with the student's Social Security Number (SSN). If you have any questions as to the entry of the student ID number as opposed to the SSN, contact your Special Education Supervisor.
Step 4 - Social Security Number
Step 3 - School
Step 5 - Date of Birth
Step 6 - Place of Birth
Step 7 - Gender
Step 8 - Primary Language
Step 9 - School
Step 10 - Language of Instruction
Step 11 - Grade
Step 12 - Race
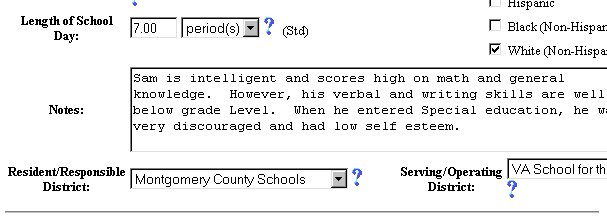
Step 13 - Transportation
Step 14 - Length of School Day
Step 15 - Editing the Notes
Step 16 - Resident/Responsible District
Step 17 - Serving/Operating District
Step 18 - Extra Address Information
Step 19 - Extra City Information
Step 20 - Extra State Information
Step 21 - Extra Zip Code Information
Step 22 - Update the Database
When you have finished adding all of the data you have for the student's personal information, click once on the Update the Database button.
NOTE: Any information marked with an ( * ) that is omitted, an error will be generated.
IMPORTANT: No information (data) will be entered into the database unless the Update the Database Button has been clicked after you have entered your data on the page.
The Editing Student Personal Information part of the editing phase is now complete for the selected student.
If you prefer to go to another area to enter IEP data, click on that button in the Students Menu Bar.
If you prefer to access another part of the database (i.e. Schools,Users, etc.), click once on the Main Menu button of the Students Menu Bar to access the Main Page and the Main Menu Bar.