EasyIEPTM
Administrative "How To....." Help
Adding A New User to the Database
Adding a new user to the EasyIEPTM database
is a simple task. It is accomplished by accessing the User section
of the Main Menu Bar. User information will become part of the
complete database, wherever a User's name and/or assignment is needed.
To add a new user to the database, follow the steps below.
Note: You must have permission to perform administrative tasks.
Permissions are assigned by the School System administration according to
User Types. If your User Type does not have this permission, contact
your System Administrator for an explanation.
Most fields will have an asterisk or a question mark
beside them. You may click once on these symbols to access the help
for that field. All fields with an asterisk ( * ) to the right MUST
HAVE INFORMATION ENTERED before the data can be entered into the EasyIEP
TM database. All fields with a question mark ( ? ) to
the right do not require information to be entered at this time, and, can
be edited or updated at any time.
Accessing the Users Administrative Area
To add a new user to the database, you must access the Users area.
This area will appear after you click once on the UsersButton on the
Main Menu Bar. The Main Menu Bar will be at the top of
the Main Page after you log-in. The words "Main Menu" will be
darkened to distinguish it.
Once you have clicked on the Users Button, the Criteria
for Selecting for Users to View Page will appear.
NOTE: If you have been working in the Students area of EasyIEP
TM and the Main Menu Bar is not at the top of the browser
page, click once on the Main Menu Button of the existing menu bar at
the top of the browser page. This will take you to the Main Page.
The Main Menu Bar will be at the top.
Adding a New User to the Database
Step 1 - Accessing the Add New User Page
Once on the Criteria for Selecting a User Page, click once on the
Add New User Button.
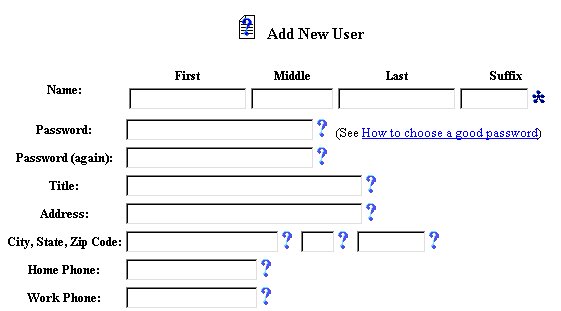
You will be taken to the Add New User Page.
Step 2 - Completing New User Information
Beside Name, click once inside of each of the text fields and type-in
the Users' name information.
NOTE: This is a required field and must have data entered for this and any
other data from this page to be entered.
Beside Password, click once in the text field and type-in a password
for the user.
Beside Password (again), click once in the text field and type-in
the SAME password again to verify it.
Beside Title, click once in the text field and type-in the title
of the user.
Beside Users' Address, click once in the text field and type-in
the street address for the user.
Beside City, State, Zip Code , click once in the first text field
and type-in the name of the City.
Beside City, State, Zip Code, click once in the second text field
and type-in the two-letter abbreviation for the State.
Beside City, State, Zip Code, click once in the third text field
and type-in the Zip Code.
Beside Users' Home Phone, click once in the text field and type-in
the Users' home phone number, including Area Code (000-000-0000).
Beside Users' Work Phone, click once in the text field and type-in
the Users' work phone number, including Area Code (000-000-0000).
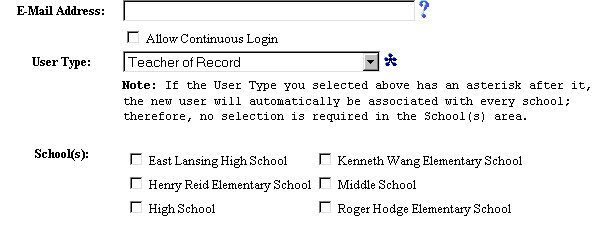
Beside Users' E-Mail, click once in the text field and type-in
the Users' E-Mail address. E-Mail addresses are CASE SENSITIVE; be sure
to type it in exactly as given.
Beside User Type, click once on the arrow on the right of the dropdown
box and select the user type that is appropriate. Remember:
User Type information will determine the level of permission for the new
user.
Select School(s) User will be associated with and click on the checkbox to
the left of the School.
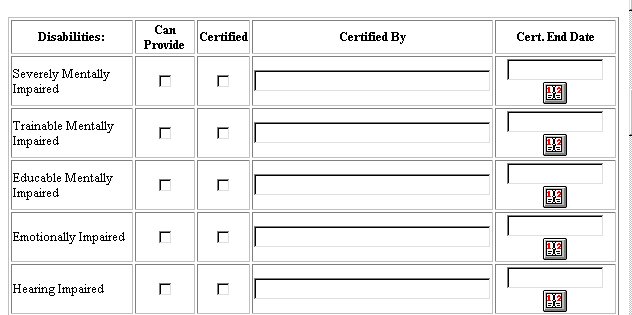
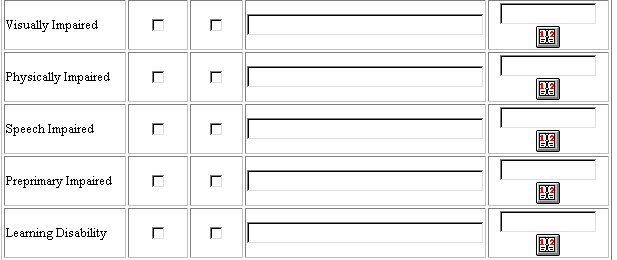
Select Disabilities and Related Services from the listing. Click on the
check boxes as required to select.
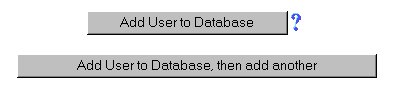
When finished, and the one user is all that will be added at this time,
click once on the Add User To Database Button. You will be returned
to the Select a User Page where the User Name and information will
appear on the User Chart.
If you want to continue adding Users to the database, click once on the
Add User to Database, then add another Button and repeat the above
procedures.
If you prefer to go to another area to enter data, You must first get back
to the Main Menu Bar.
To return to the Main Menu Bar, click once on the Main Menu
Button of the Users Menu Bar. The Main Menu Bar will appear
at the top of the page.