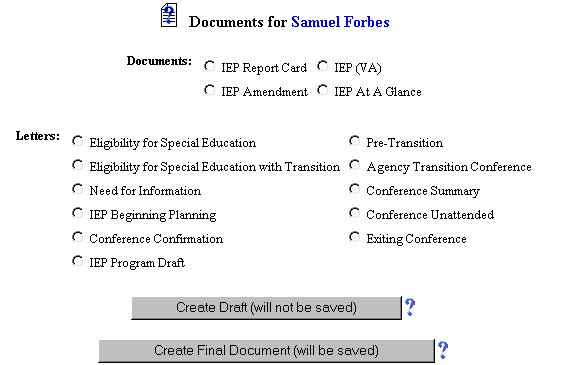
Step 3 - Select the Document
Initial Phase - Generating Documents
EasyIEPTM uses your School System data andthe student data teachers enter to generate IEPs, Letters, IEP Amendments,andIEP Report Cards. Each piece of data is placed on the letter orreporting the order, font, and size that was determined by your School System. Therefore, you only need to enter information once for it to appear on many letters and reports.
Preview (Draft), Creation, and Printing of Documents
EasyIEPTM stores reports and letters just as they
are printed. This allows all authorized school personnel to have access to
the documents as soon as they are stored without having to go to a school
or other office. To prevent documents that are "works in progress"from
being stored, EasyIEPTM has two modes for generating documents: Preview
(Draft) and Generate (Final).
Preview (Draft) allows you to see and print a document for review before it becomes official. For example; You may want to Preview an IEP to see if all of the information is present and correct. The preview document can be shared with the IEP team, but WILL NOT be stored . Each page of a preview document is marked DRAFT to show that itis not the final version.
When you Generate a document, EasyIEPTM stores that copy for future reference. It will look exactly like the Preview (Draft) copy except that the preview markers areremoved.
One popular strategy is to print a Preview (Draft) copy of your IEP and take it to the IEP meeting. Changes can be marked on the paper. Once all changes have been marked, the IEP team (including parents) can sign the Signature Page. You can then make the changes to the IEP and Generate an official copy for the entire IEP team. This Generated copy will appear in your list of documents the next time you visit the Documents Page.
Note: Any document, Preview or Generated, may be printed. These printed copies will look just like the screen versions. EasyIEPTM uses Adobes' PDF format for viewingand printing (see later section).
How documents are generated by EasyIEPTM
When you want to view and/or print a document, EasyIEPTM
retrieves the appropriate information from the database. In many cases, Easy
IEPTM will need a few other pieces of data that
are not in the database. In these cases, you will be taken to a page to fill
in the required data. Once you fill in the additional data, EasyIEP
TM creates the document in Portable Document Format (PDF)
.PDF has become the Internet standard for producing documents thathave the
full range of formatting of word processors. This is required becauseweb
pages are not printed in the same format on different computers.For more
details, see the Adobe Acrobat Reader section below.
Viewing and Printing Documents on Your Computer
Once EasyIEPTM has generated your document, it
stores it in a PDF file. This file is sent to your computer via the
Internet just like any web page or graphic when you click on the View PDF
file link.
What happens when it arrives at your computer depends upon your browser (Netscape, MS Explorer, etc.) and how it is configured. If you have Adobe Acrobat Reader (see section below) installed on your computer, you will see the document immediately. If you do not have Adobe Acrobat Reader installed, your browser will ask you to select an application. If this occurs, you need to install Adobe Acrobat Reader on your computer (or have your IT staff do it for you). You may select to print the document from the Adobe AcrobatReader File Menu or Adobe Acrobat Reader Print Button .Do NOT use the Browser Print Button.
Adobe Acrobat Reader
To view documents generated by EasyIEPTM, Adobe Acrobat Reader is free
to everyone and may be downloaded from the Adobe web site. Installation
instructions may also be downloaded. To test to see if AdobeAcrobat Reader
is installed on your computer, go to the login screen (screen where you enter
your account and password). Click on the Test forAdobe Reader link
on the left of the page. A short PDF file will be sent to your computer via
the Internet. If you have Adobe Reader installed, you should see the test
document.If you get a message asking you to "Select an Application", then
it is likely that you do not have the Reader installedIf this occurs, you
can click on the "Get Acrobat Reader "icon at the lower left of the page. This
will take you to the Adobe web site where you can download the free Reader.
Follow the installation instructions.
List of Created Documents
EasyIEPTM stores all of the Generated documents
for each student. A list of all of these documents may be found at
thebottom of the Document Page.
Most fields will have an asterisk or a questionmark beside them. You may click once on these symbols to access thehelp for that field. All fields with an asterisk ( * ) to the rightMUSTHAVE INFORMATION ENTERED before the data can be entered into the EasyIEP TM database. All fields with a questionmark ( ? ) to the right do not require information to be entered at this time,and, can be edited or updated at any time.
Accessing the Students Area
To add information for a selected student or students, you must access the Students area. This area will appear after you click once on the Students button on the Main Menu Bar. The Main Menu Bar will be at the top of the Main Page after you log-in. The words "Main Menu" will be darkened to distinguish it.
NOTE: If you have been working in another area of EasyIEP TM(i.e. Schools, School System, Users), and the Main Menu Bar is not at the top of the browser page, click once on the Main Menu Button of the existing menu bar at the top of the browser page. This will take you to the Main Page. The Main Menu Bar will be at the top. Click once on the Students Button to access the Studentsarea.
Step 1 - Criteria for Selecting a Student
Step 2 - Accessing the Document Menu
Step 3 - Select the Document
Step 4 - Preview or Generate

Note: Previewed documents may be printed again and again. You will not lose any data when you preview a document. Each Preview copy will show the latest changes for the student. Once you create a document, that document is saved just as it was printed thefirst time no matter what changes are made in the student's data.
Step 5 - Entering Additional Information and/or Editing Letters
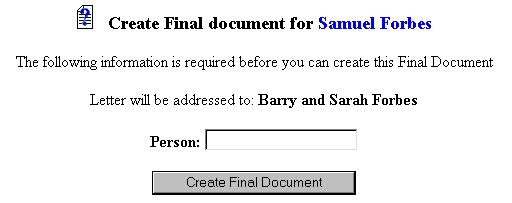
Depending on the document selected, you may be presented with a form to enter additional information that is not in the database. This may be the date, time, parent information, or other needed items associated with the letter or document.
Step 6 - Editing the Text Before Generating
Step 7 - Generating the Document
Step 8 - Printing
Once you have your document in the Adobe Acrobat Reader, you may print the document by selecting Print from the Adobe Acrobat File Menu or clicking the Adobe Acrobat Print Button.
It is important to remember that the Adobe Acrobat Reader screen is simply
another window. If you are using the Windows operating system, and
the AdobeAcrobat Reader is being presently used, it will have a button at
the bottomon the Task bar. When you finish printing all of the documents
youneed, you can exit Adobe Acrobat Reader by (1) clicking on the program
buttonon the Task bar and then (2) clicking on the X in the upper right-hand
corner.
When printing your document,be sure to select the Print button or Print from the File Menu of Adobe Acrobat Reader and not the browser.
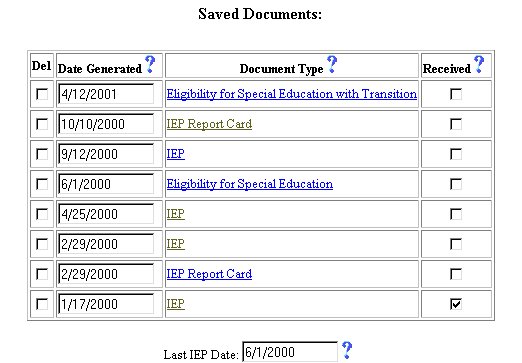
Step 9 - Stored Documents
All documents that were generated with the Generate (Final) button are stored in the EasyIEPTM database. If one or more documents have been generated for a student, a list of the documents will be displayed in a chart at the bottom of the page. If you click on the name of the document in the list, the PDF file for the document will be sent to your computer for viewing and/or printing.
Step 10 - The Received Marker (see above graphic)
Step 11 - Leaving the Adobe Acrobat Reader
Some configurations will require you to click on the Back button of your browser to exit the Adobe Acrobat Reader. Use your Back button to return to the Documents Page to select and print other documents. When you have finished printing all of the documents you need, exit the Adobe Acrobat Reader program.
The Generate Documents part of the initial phase is now complete for the selected student. You have now completed the full initial phase of completing an IEP. CONGRATULATIONS!
If you would like to repeat the initial phase process, click once on the word Students (in black) on the Students Menu Bar. This will take you to the Select a Student Page. You may then select a new student from the chart and begin the initial phase process.
If you prefer to go to another area to enter IEP data, click on that button in the Students Menu Bar.
If you prefer to access another part of the database (i.e. Schools, Users, etc.), click once on the Main Menu button of the Students MenuBar to access the Main Page and the Main Menu Bar.