Adding a Student to the Database
Adding a student to the database is one of the primary administrative functions. It will allow the administrator to not only add the student's personal information, but will assign the student to the school he/she will be attending. Once assigned to a school, teacher assignments can then be made.
Adding a student will differ depending upon the permission granted to your User account. You will either be able to add a student to any school in the School System, add a student to your assigned school, or you will not be able to add a student.
Note: You must have permission to perform administrative tasks. Permissions are assigned by the School System administration according to User Types. If your User Type does not have this permission, contact your System Administrator for an explanation.
Users who cannot add students will not see an Add new studentButton on the Select a Student Page or the Criteria for SelectingStudents to View Page.
To add a student to the database, follow the steps below.
Most fields will have an asterisk or a question mark beside them. You may click once on these symbols to access the help for that field. All fields with an asterisk ( * ) to the rightMUST HAVE INFORMATION ENTERED before the data can be entered into theEasy IEPTM database. All fields with a question mark ( ? ) to the right do not require information to be entered at this time, and, can be edited or updated at any time.
Accessing the Administrators' Students Area
To add a student to the database, you must access the Studentsarea. This area will appear after you click once on the StudentsButton on the Main Menu Bar. The Main Menu Bar will be at the top of the Main Page after you log-in. The words "Main Menu" will be darkened to distinguish it.
NOTE: If you have been working in the Students area of EasyIEP TM and the Main Menu Bar is not at the top of the browser page, click once on the Main Menu Button of the existing menu bar at the top of the browser page. This will take you to the Main Page. The Main Menu Bar will be at the top.
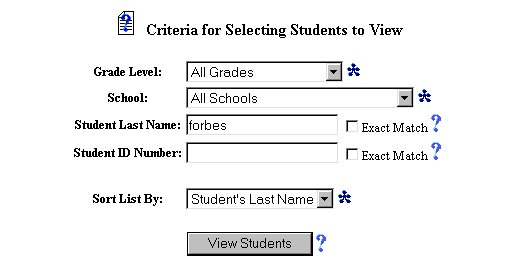
Click on the Students Button of the Main Menu to go to the Criteria for Selecting Students to View Page. The number of students in the list will depend upon the User Type and Permission of the User. Generally, Teachers see only the students that are assigned to them. School System Administrators could see every student in the entire School System. Thus, an Administrators' list could be very long.
If the number of students in the list is less than 100, you will be transferred directly to the Select a Student Page.
After transferring to the Criteria for Selecting Students to View
Page, go to the bottom of the page.
NOTE: Selecting the new student's school is not required. However,
it is strongly recommended. If you do not select the school,
you will not be able to assign a teacher. This can be done at a later
time, but it will take more time.
To select a school for the new student, use the dropdown list to the right of the Add new student to-> Button.
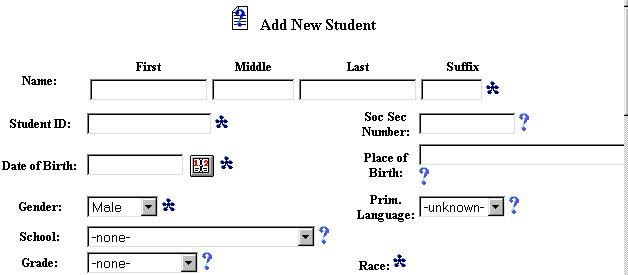

Adding Student Personal Information
Some student data may have already been imported by the School System. If this has not occurred, or, you have not visited this page at an earlier time, there will be no data entered in the fields. To complete the data entry for the student's personal information, follow these steps:
Step 1 - Name
This is a required field and must have data entered for this and any other data on the page to be updated into the EasyIEPTM database.
This is an optional field and may or may not have data entered.
This is a required field and must have data entered for this and any other data on the page to be updated into the EasyIEPTM database.
This is an optional field and may or may not have data entered.
Step 2 - Student Identification Number
Step 3 - Social Security Number
Step 4 - Date of Birth
Step 5 - Place of Birth
Step 6 - Gender
Step 7 - Primary Language
Step 8 - School (if not assigned)
Step 9 - Language of Instruction
Step 10 - Grade
Step 11 - Race
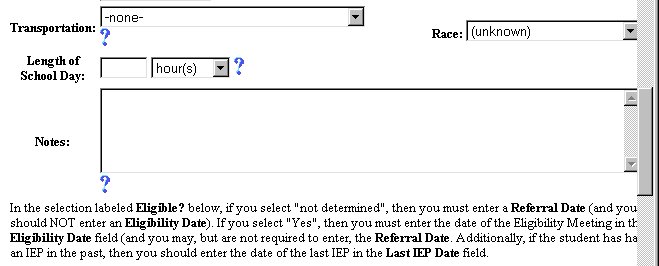
Step 12 - Transportation
Step 13 - Length of School Day
Step 14 - Editing the Notes
In the selection labeled Eligible? below, if you select "not determined", then you must enter a Referral Date (and you should NOT enter an Eligibility Date). If you select "Yes",then you must enter the date of the Eligibility Meeting in theEligibility Date field (and you may, but are not required to enter, the Referral Date. Additionally, if the student has had an IEP in the past, then you should enter the date of the last IEP in the Last IEP Date field.
Step 15 - Child Study Date
Step 16 - Referral Date
Step 17 - Referral Source
Step 18 - Eligible ?
Step 19 - Eligibility Date
Step 20 - Last IEP Date
Step 21 - Primary Disability
Step 22/23 - Secondary and Third Disability
Step 24 - Add Student to Database
When you have finished adding all of the data you have for the student's personal information, click once on the Add Student to Database Button or the Add Student to Database, then add another Button.
Any areas marked ( * ) with no data entered will result in an error being generated.
The "How to" step-by-step explanation is now complete for the selected student.
If you prefer to go to another area to enter IEP data, click on that Button in the Students Menu Bar.
If you prefer to access another part of the database (i.e. Schools, Users, etc.), click once on the Main Menu Button of the Students Menu Bar to access the Main Page and the Main Menu Bar.